So, this week is Spring Break, and next week is my birthday. I thought about going someplace exotic by myself this week, but by the time I looked for plane tickets, prices were about double what I wanted to pay. So I'm having a staycation this week, and getting a start on celebrating my birthday. One of this week's goals is to try out different restaurants and cuisines I haven't had before. Another is to have lunch with some friends I haven't gotten to spend time with recently. And another is to get the perfect outfit for my birthday outing next week--going to a nice restaurant, then to an Itzhak Perlman concert. (He's a very famous violinist, and I'm a violinist and love hearing other people play, so it's pretty much the perfect gift.)
I got a bit of a start on the outing outfit Friday after work, and Saturday I started on the restaurants. The friend I met at Bowl of Pho (a Vietnamese restaurant) suggested I document all this week's gastronomic adventures, so I decided this was as good a place as any. So here are this week's adventures as I celebrate my birthday and vacation here at home!
Monday, March 16, 2015
Sunday, April 15, 2012
Hair Necklace
 I'd found this tutorial on how to create a really awesome "hair necklace" on Pinterest a few months ago. This weekend, some friends and I got together for a James Bond-themed party, and I was trying to find a really awesome way to fix my hair. After deciding to go with an asymmetrical sock bun, I began wondering if the hair necklace would be a nice finishing touch. I bought two kinds of chain at Michael's: a shiny silver one and a gunmetal one, as well as a hair comb from the bridal department. I'd originally wanted a plain metal one, but all they had was metal with rhinestone flowers, or plain clear plastic, so I decided to go with the rhinestones. I didn't measure anything--I just held the chains up to decide how long I wanted them, then wired one end of each to the comb. I put the other ends on a little jump ring, which I slid onto a bobby pin, and I was finished! I'm really looking forward to trying this underneath a normal, centered-on-my-head type of bun.
Wednesday, April 11, 2012
Manly Gift Wrap

A guy friend's birthday was this past week, and I wanted to wrap his present nicely without making it look to "girly." This is what I came up with. It's wrapped in the same black-on-black paper I put on the back of my bookcase a few months back. I figured that was elegant, yet manly. I tied some white curling ribbon around it, and totally didn't like the look. I tried tying a simple bow, instead of fluffy curls, and then it just looked cheap and boring.
 I was going through my stationery box to find one of the plain red cards I knew I had, when I happened upon the sealing wax I hadn't used in years. I decided to seal the back of the envelope with gold wax, and decorate the gift with a matching red wax seal. A simple loop half-bow of curling ribbon, a nice big blob of wax, my fleur-de-lis seal, and there it is!
 I was going through my stationery box to find one of the plain red cards I knew I had, when I happened upon the sealing wax I hadn't used in years. I decided to seal the back of the envelope with gold wax, and decorate the gift with a matching red wax seal. A simple loop half-bow of curling ribbon, a nice big blob of wax, my fleur-de-lis seal, and there it is!
Saturday, April 7, 2012
Happy Easter!
 It's almost too late, but I wanted to share a quick little Easter decoration I made last week. I had four eggs left over after putting a project together for work, and they were a nice light blue and white. I decided to make a little hanging for my living room bookcase--something to hang on the little Command hook I added at Christmas.
 Step 1: Use a sanding block to rough up the edges. I was able to get a nice "eggshell" finish pretty quickly. I started with the rougher side, then used a smoother side to get any areas that still looked just like scratched-up shininess. In the picture, the eggs on the left are the originals, and the ones on the right are the sanded ones.
 At first, I thought I would wrap ribbon around the seam of each egg, but they wound up looking fine without it. You don't even notice the seam! Now, you might if they were in a brighter room, or on the front door, but there's not usually very bright light in that area of the room, so I didn't worry about it.
Step 2: Hang the eggs on ribbon. The eggs I used had two holes in each end. I just looped the ribbon through, tied knots at the top, and tied ribbon bows around the top to hold it all together. I'm proud of myself--I was able to use the remnants of two different spools of ribbon! Two down, twenty bazillion to go.

Here's the finished product. Isn't it nice?
Sunday, April 1, 2012
Wedding Card
 I'm trying to be better about actually remembering cards for events. For birthdays, I usually just write a little note on a small blank card, but for my friends' wedding, I wanted to make something special. The wedding colors are red and black, and after searching through my papers, I found a glittery cardstock that was cream, pink, and a funny color of red, and a striped paper with a similar shade of red. I also had some stickers and a cream envelope.

I trimmed the papers so the card would fit into the envelope, then used the scraps and some letter stickers to embellish the envelope. I cut some smaller plain pieces of paper to give me a solid background for the message sticker and my own handwritten message (that I'll add later), used some glue stick to put it all together, and wound up with this!

Wednesday, March 28, 2012
Birds and Blossoms
Here's how I made the little cardboard bird and the paper cherry blossoms I showed you last time. This isn't exactly a tutorial. It's more of a "this is what I did, try it yourself" sort of thing. I'll start with the bird.
 I was actually about to throw away some pieces of corrugated cardboard that had been included in with some scrapbooking paper, when I stopped to think. I'd been looking on Pinterest at pictures of birds, bird nests, and eggs, and I realized that the cardboard might make a good nest. Now, my cardboard was 2-layer corrugated cardboard--a flat layer and a bumpy layer. If you have the three-layer (flat-bumpy-flat) kind, you'll get a different look. It took me less than one 12x12 sheet of cardboard to make a nest and bird about 4 inches across.
I started by cutting a little circle for the nest base (about 2.5 inches) and strips for the nest sides. The ones you see here are about half an inch wide, but I wound up cutting them all in half.
 Next, I braided some of the strips together until I had a strip a couple feet long. Once I thought it was long enough, I wrapped it into a circle and started poking the ends into the braid to make it stay.
 I started wrapping more and more strips around, poking them in so they would stay. When I finished, I rolled up my last strip and put it in the bottom, right on top of the cardboard circle.
My original plan was to just make a nest, but I didn't have anything to put in it, and it looked kind of silly by itself, so I made a little bird to sit in the nest. I just drew a bird sort of shape, cut out 4 copies (to make it a bit thicker), cut a slit to put the tail shape, and hot-glued the wing shapes on. I also used a bit of chalk to color it a bit robin-like, but I'm not sure if that shows up much.

Before I glued the bird in, I decided the nest needed some color and sparkle to keep it from looking so drab beside the brightly colored bottle and the shiny angel, so I put some sparkly trim and some green ribbon into the nest, as well. I'm liking the way it turned out!

 These were the starting ingredients for the cherry blossom branches: some twigs that fell out of my oak tree, and some flowers punched from my paper scraps (the same paper as the bunting and paper balls). I fought with the twigs until they fit the vase and the shelf, then I punched about twenty bazillion flower shapes.

 Next, I shaped the flowers. I tried making flowers with two layers and with three. I preferred the three-layer flowers, but I'm not sure it makes much difference when seeing them from a distance greater than about a foot. The bottom flower I lay flat, with the white side up. The second layer I just pinched all the petals so they pointed up (again, with the white side up). On the ones where I made a third layer, I did the same as the second layer, but then squashed the petals a bit, so they kind of pointed towards the center. You can sort of see how it works out here. I held them together by dabbing a bit of glue stick on the centers of the second and third layers before stacking them.

Finally, I used a dab of hot glue to stick the flowers to the twigs. I used about 25-30 flowers here, but it would probably look even better with more. This was about the extent of my flower-punching hand strength, though. I'm really pleased with how these turned out, as well!
I'll leave you with a photo of a real bird who decided to put her nest right up by my house! I don't feed the neighborhood ducks, as a rule (they can get scary), but this mama duck is going to be bribed with bread so she'll let me get near the babies!

 I was actually about to throw away some pieces of corrugated cardboard that had been included in with some scrapbooking paper, when I stopped to think. I'd been looking on Pinterest at pictures of birds, bird nests, and eggs, and I realized that the cardboard might make a good nest. Now, my cardboard was 2-layer corrugated cardboard--a flat layer and a bumpy layer. If you have the three-layer (flat-bumpy-flat) kind, you'll get a different look. It took me less than one 12x12 sheet of cardboard to make a nest and bird about 4 inches across.
I started by cutting a little circle for the nest base (about 2.5 inches) and strips for the nest sides. The ones you see here are about half an inch wide, but I wound up cutting them all in half.
 Next, I braided some of the strips together until I had a strip a couple feet long. Once I thought it was long enough, I wrapped it into a circle and started poking the ends into the braid to make it stay.
My original plan was to just make a nest, but I didn't have anything to put in it, and it looked kind of silly by itself, so I made a little bird to sit in the nest. I just drew a bird sort of shape, cut out 4 copies (to make it a bit thicker), cut a slit to put the tail shape, and hot-glued the wing shapes on. I also used a bit of chalk to color it a bit robin-like, but I'm not sure if that shows up much.

Before I glued the bird in, I decided the nest needed some color and sparkle to keep it from looking so drab beside the brightly colored bottle and the shiny angel, so I put some sparkly trim and some green ribbon into the nest, as well. I'm liking the way it turned out!


 Next, I shaped the flowers. I tried making flowers with two layers and with three. I preferred the three-layer flowers, but I'm not sure it makes much difference when seeing them from a distance greater than about a foot. The bottom flower I lay flat, with the white side up. The second layer I just pinched all the petals so they pointed up (again, with the white side up). On the ones where I made a third layer, I did the same as the second layer, but then squashed the petals a bit, so they kind of pointed towards the center. You can sort of see how it works out here. I held them together by dabbing a bit of glue stick on the centers of the second and third layers before stacking them.
Finally, I used a dab of hot glue to stick the flowers to the twigs. I used about 25-30 flowers here, but it would probably look even better with more. This was about the extent of my flower-punching hand strength, though. I'm really pleased with how these turned out, as well!
I'll leave you with a photo of a real bird who decided to put her nest right up by my house! I don't feed the neighborhood ducks, as a rule (they can get scary), but this mama duck is going to be bribed with bread so she'll let me get near the babies!

Saturday, March 24, 2012
Decorating the Alcoves
I've redecorated the built-in bookcases in my living room a few times (you've seen several of those), but I have what was originally a phone nook in my hallway that hasn't been redecorated since a month after I moved into my house. Usually, I have my violin-playing angels who are not white or clear in the nook, but I decided to move the whole violin angel collection to the living room shelves for spring, leaving the nook completely empty. Last time I showed you how I made the bunting and the first of the little paper balls. Today, I'll show you how I used it all.
 First, I put the three mercury glass candlesticks I got on after-Christmas clearance into the phone nook. There was only room for a candle on the shortest one, so I had to figure out something else for the others. The tall pillar candle got the paper ball, I used some of the paper scraps from the bunting to make little flags (sewed them onto toothpicks), and I made a couple more paper balls after I found the glue stick.

The candle I wanted to use (an LED candle with a timer, so it turns on and off at the same time every evening) was too dark to go with this arrangement, so I tied a large-ish scrap of paper around it. It doesn't quite meet in the back, but you can't see, so no one can tell!
 Here's a better view of everything. If I had some sticky tack, I'd put it in the bottom of the taper holder to make the little flags stand up a bit better.
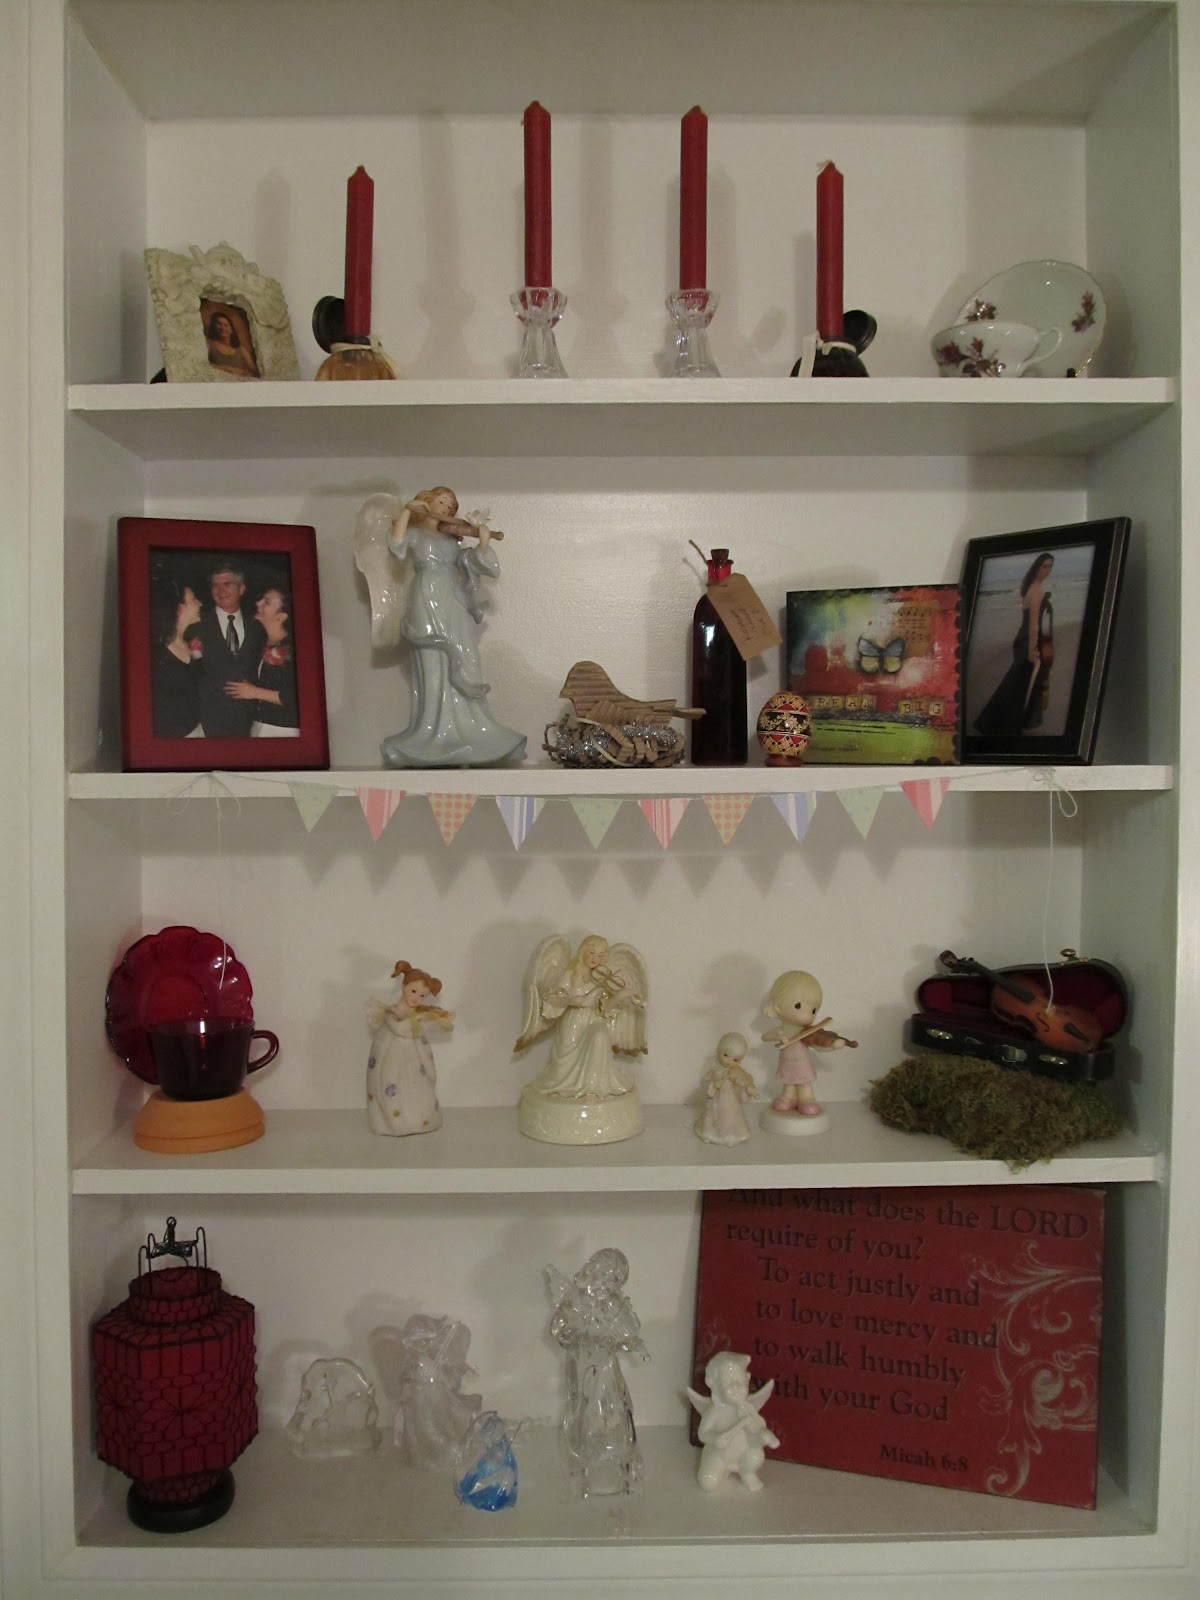
 Here's the shelves in the living room. They've gone through about six different incarnations, but I think this is how they'll stay, at least for a few weeks! The top and bottom shelves are just like they were. The next-to-bottom shelf has my violin angels that used to be in the phone nook, and the next-to-top shelf was the one that drove me nuts. I put one of the violin angels there, as well as a picture some students had given me (it's kind of hot pink and lime green), a red bottle, and a little bird on a nest I made on the spur of the moment.
 The last shelf I'm showing you is the corner shelf in the living room. It's another one that drove me batty for a few weeks! I've left the bottom three shelves the way they were, added some ceramic birds to the next to top shelf, and finally figured out what to do with the top. I created some little cherry blossom branches!
Next time, I'll share how I made the bird and the flowers. They were originally going to be in this post, but it was getting pretty long already!
 First, I put the three mercury glass candlesticks I got on after-Christmas clearance into the phone nook. There was only room for a candle on the shortest one, so I had to figure out something else for the others. The tall pillar candle got the paper ball, I used some of the paper scraps from the bunting to make little flags (sewed them onto toothpicks), and I made a couple more paper balls after I found the glue stick.
The candle I wanted to use (an LED candle with a timer, so it turns on and off at the same time every evening) was too dark to go with this arrangement, so I tied a large-ish scrap of paper around it. It doesn't quite meet in the back, but you can't see, so no one can tell!

 The last shelf I'm showing you is the corner shelf in the living room. It's another one that drove me batty for a few weeks! I've left the bottom three shelves the way they were, added some ceramic birds to the next to top shelf, and finally figured out what to do with the top. I created some little cherry blossom branches!
Next time, I'll share how I made the bird and the flowers. They were originally going to be in this post, but it was getting pretty long already!
Subscribe to:
Posts (Atom)