 I'd found this tutorial on how to create a really awesome "hair necklace" on Pinterest a few months ago. This weekend, some friends and I got together for a James Bond-themed party, and I was trying to find a really awesome way to fix my hair. After deciding to go with an asymmetrical sock bun, I began wondering if the hair necklace would be a nice finishing touch. I bought two kinds of chain at Michael's: a shiny silver one and a gunmetal one, as well as a hair comb from the bridal department. I'd originally wanted a plain metal one, but all they had was metal with rhinestone flowers, or plain clear plastic, so I decided to go with the rhinestones. I didn't measure anything--I just held the chains up to decide how long I wanted them, then wired one end of each to the comb. I put the other ends on a little jump ring, which I slid onto a bobby pin, and I was finished! I'm really looking forward to trying this underneath a normal, centered-on-my-head type of bun.
Sunday, April 15, 2012
Hair Necklace
I'd found this tutorial on how to create a really awesome "hair necklace" on Pinterest a few months ago. This weekend, some friends and I got together for a James Bond-themed party, and I was trying to find a really awesome way to fix my hair. After deciding to go with an asymmetrical sock bun, I began wondering if the hair necklace would be a nice finishing touch. I bought two kinds of chain at Michael's: a shiny silver one and a gunmetal one, as well as a hair comb from the bridal department. I'd originally wanted a plain metal one, but all they had was metal with rhinestone flowers, or plain clear plastic, so I decided to go with the rhinestones. I didn't measure anything--I just held the chains up to decide how long I wanted them, then wired one end of each to the comb. I put the other ends on a little jump ring, which I slid onto a bobby pin, and I was finished! I'm really looking forward to trying this underneath a normal, centered-on-my-head type of bun.
Wednesday, April 11, 2012
Manly Gift Wrap

A guy friend's birthday was this past week, and I wanted to wrap his present nicely without making it look to "girly." This is what I came up with. It's wrapped in the same black-on-black paper I put on the back of my bookcase a few months back. I figured that was elegant, yet manly. I tied some white curling ribbon around it, and totally didn't like the look. I tried tying a simple bow, instead of fluffy curls, and then it just looked cheap and boring.
 I was going through my stationery box to find one of the plain red cards I knew I had, when I happened upon the sealing wax I hadn't used in years. I decided to seal the back of the envelope with gold wax, and decorate the gift with a matching red wax seal. A simple loop half-bow of curling ribbon, a nice big blob of wax, my fleur-de-lis seal, and there it is!
 I was going through my stationery box to find one of the plain red cards I knew I had, when I happened upon the sealing wax I hadn't used in years. I decided to seal the back of the envelope with gold wax, and decorate the gift with a matching red wax seal. A simple loop half-bow of curling ribbon, a nice big blob of wax, my fleur-de-lis seal, and there it is!
Saturday, April 7, 2012
Happy Easter!
 It's almost too late, but I wanted to share a quick little Easter decoration I made last week. I had four eggs left over after putting a project together for work, and they were a nice light blue and white. I decided to make a little hanging for my living room bookcase--something to hang on the little Command hook I added at Christmas.
 Step 1: Use a sanding block to rough up the edges. I was able to get a nice "eggshell" finish pretty quickly. I started with the rougher side, then used a smoother side to get any areas that still looked just like scratched-up shininess. In the picture, the eggs on the left are the originals, and the ones on the right are the sanded ones.
 At first, I thought I would wrap ribbon around the seam of each egg, but they wound up looking fine without it. You don't even notice the seam! Now, you might if they were in a brighter room, or on the front door, but there's not usually very bright light in that area of the room, so I didn't worry about it.
Step 2: Hang the eggs on ribbon. The eggs I used had two holes in each end. I just looped the ribbon through, tied knots at the top, and tied ribbon bows around the top to hold it all together. I'm proud of myself--I was able to use the remnants of two different spools of ribbon! Two down, twenty bazillion to go.

Here's the finished product. Isn't it nice?
Sunday, April 1, 2012
Wedding Card
 I'm trying to be better about actually remembering cards for events. For birthdays, I usually just write a little note on a small blank card, but for my friends' wedding, I wanted to make something special. The wedding colors are red and black, and after searching through my papers, I found a glittery cardstock that was cream, pink, and a funny color of red, and a striped paper with a similar shade of red. I also had some stickers and a cream envelope.

I trimmed the papers so the card would fit into the envelope, then used the scraps and some letter stickers to embellish the envelope. I cut some smaller plain pieces of paper to give me a solid background for the message sticker and my own handwritten message (that I'll add later), used some glue stick to put it all together, and wound up with this!

Wednesday, March 28, 2012
Birds and Blossoms
Here's how I made the little cardboard bird and the paper cherry blossoms I showed you last time. This isn't exactly a tutorial. It's more of a "this is what I did, try it yourself" sort of thing. I'll start with the bird.
 I was actually about to throw away some pieces of corrugated cardboard that had been included in with some scrapbooking paper, when I stopped to think. I'd been looking on Pinterest at pictures of birds, bird nests, and eggs, and I realized that the cardboard might make a good nest. Now, my cardboard was 2-layer corrugated cardboard--a flat layer and a bumpy layer. If you have the three-layer (flat-bumpy-flat) kind, you'll get a different look. It took me less than one 12x12 sheet of cardboard to make a nest and bird about 4 inches across.
I started by cutting a little circle for the nest base (about 2.5 inches) and strips for the nest sides. The ones you see here are about half an inch wide, but I wound up cutting them all in half.
 Next, I braided some of the strips together until I had a strip a couple feet long. Once I thought it was long enough, I wrapped it into a circle and started poking the ends into the braid to make it stay.
 I started wrapping more and more strips around, poking them in so they would stay. When I finished, I rolled up my last strip and put it in the bottom, right on top of the cardboard circle.
My original plan was to just make a nest, but I didn't have anything to put in it, and it looked kind of silly by itself, so I made a little bird to sit in the nest. I just drew a bird sort of shape, cut out 4 copies (to make it a bit thicker), cut a slit to put the tail shape, and hot-glued the wing shapes on. I also used a bit of chalk to color it a bit robin-like, but I'm not sure if that shows up much.

Before I glued the bird in, I decided the nest needed some color and sparkle to keep it from looking so drab beside the brightly colored bottle and the shiny angel, so I put some sparkly trim and some green ribbon into the nest, as well. I'm liking the way it turned out!

 These were the starting ingredients for the cherry blossom branches: some twigs that fell out of my oak tree, and some flowers punched from my paper scraps (the same paper as the bunting and paper balls). I fought with the twigs until they fit the vase and the shelf, then I punched about twenty bazillion flower shapes.

 Next, I shaped the flowers. I tried making flowers with two layers and with three. I preferred the three-layer flowers, but I'm not sure it makes much difference when seeing them from a distance greater than about a foot. The bottom flower I lay flat, with the white side up. The second layer I just pinched all the petals so they pointed up (again, with the white side up). On the ones where I made a third layer, I did the same as the second layer, but then squashed the petals a bit, so they kind of pointed towards the center. You can sort of see how it works out here. I held them together by dabbing a bit of glue stick on the centers of the second and third layers before stacking them.

Finally, I used a dab of hot glue to stick the flowers to the twigs. I used about 25-30 flowers here, but it would probably look even better with more. This was about the extent of my flower-punching hand strength, though. I'm really pleased with how these turned out, as well!
I'll leave you with a photo of a real bird who decided to put her nest right up by my house! I don't feed the neighborhood ducks, as a rule (they can get scary), but this mama duck is going to be bribed with bread so she'll let me get near the babies!

 I was actually about to throw away some pieces of corrugated cardboard that had been included in with some scrapbooking paper, when I stopped to think. I'd been looking on Pinterest at pictures of birds, bird nests, and eggs, and I realized that the cardboard might make a good nest. Now, my cardboard was 2-layer corrugated cardboard--a flat layer and a bumpy layer. If you have the three-layer (flat-bumpy-flat) kind, you'll get a different look. It took me less than one 12x12 sheet of cardboard to make a nest and bird about 4 inches across.
I started by cutting a little circle for the nest base (about 2.5 inches) and strips for the nest sides. The ones you see here are about half an inch wide, but I wound up cutting them all in half.
 Next, I braided some of the strips together until I had a strip a couple feet long. Once I thought it was long enough, I wrapped it into a circle and started poking the ends into the braid to make it stay.
My original plan was to just make a nest, but I didn't have anything to put in it, and it looked kind of silly by itself, so I made a little bird to sit in the nest. I just drew a bird sort of shape, cut out 4 copies (to make it a bit thicker), cut a slit to put the tail shape, and hot-glued the wing shapes on. I also used a bit of chalk to color it a bit robin-like, but I'm not sure if that shows up much.

Before I glued the bird in, I decided the nest needed some color and sparkle to keep it from looking so drab beside the brightly colored bottle and the shiny angel, so I put some sparkly trim and some green ribbon into the nest, as well. I'm liking the way it turned out!


 Next, I shaped the flowers. I tried making flowers with two layers and with three. I preferred the three-layer flowers, but I'm not sure it makes much difference when seeing them from a distance greater than about a foot. The bottom flower I lay flat, with the white side up. The second layer I just pinched all the petals so they pointed up (again, with the white side up). On the ones where I made a third layer, I did the same as the second layer, but then squashed the petals a bit, so they kind of pointed towards the center. You can sort of see how it works out here. I held them together by dabbing a bit of glue stick on the centers of the second and third layers before stacking them.
Finally, I used a dab of hot glue to stick the flowers to the twigs. I used about 25-30 flowers here, but it would probably look even better with more. This was about the extent of my flower-punching hand strength, though. I'm really pleased with how these turned out, as well!
I'll leave you with a photo of a real bird who decided to put her nest right up by my house! I don't feed the neighborhood ducks, as a rule (they can get scary), but this mama duck is going to be bribed with bread so she'll let me get near the babies!

Saturday, March 24, 2012
Decorating the Alcoves
I've redecorated the built-in bookcases in my living room a few times (you've seen several of those), but I have what was originally a phone nook in my hallway that hasn't been redecorated since a month after I moved into my house. Usually, I have my violin-playing angels who are not white or clear in the nook, but I decided to move the whole violin angel collection to the living room shelves for spring, leaving the nook completely empty. Last time I showed you how I made the bunting and the first of the little paper balls. Today, I'll show you how I used it all.
 First, I put the three mercury glass candlesticks I got on after-Christmas clearance into the phone nook. There was only room for a candle on the shortest one, so I had to figure out something else for the others. The tall pillar candle got the paper ball, I used some of the paper scraps from the bunting to make little flags (sewed them onto toothpicks), and I made a couple more paper balls after I found the glue stick.

The candle I wanted to use (an LED candle with a timer, so it turns on and off at the same time every evening) was too dark to go with this arrangement, so I tied a large-ish scrap of paper around it. It doesn't quite meet in the back, but you can't see, so no one can tell!
 Here's a better view of everything. If I had some sticky tack, I'd put it in the bottom of the taper holder to make the little flags stand up a bit better.
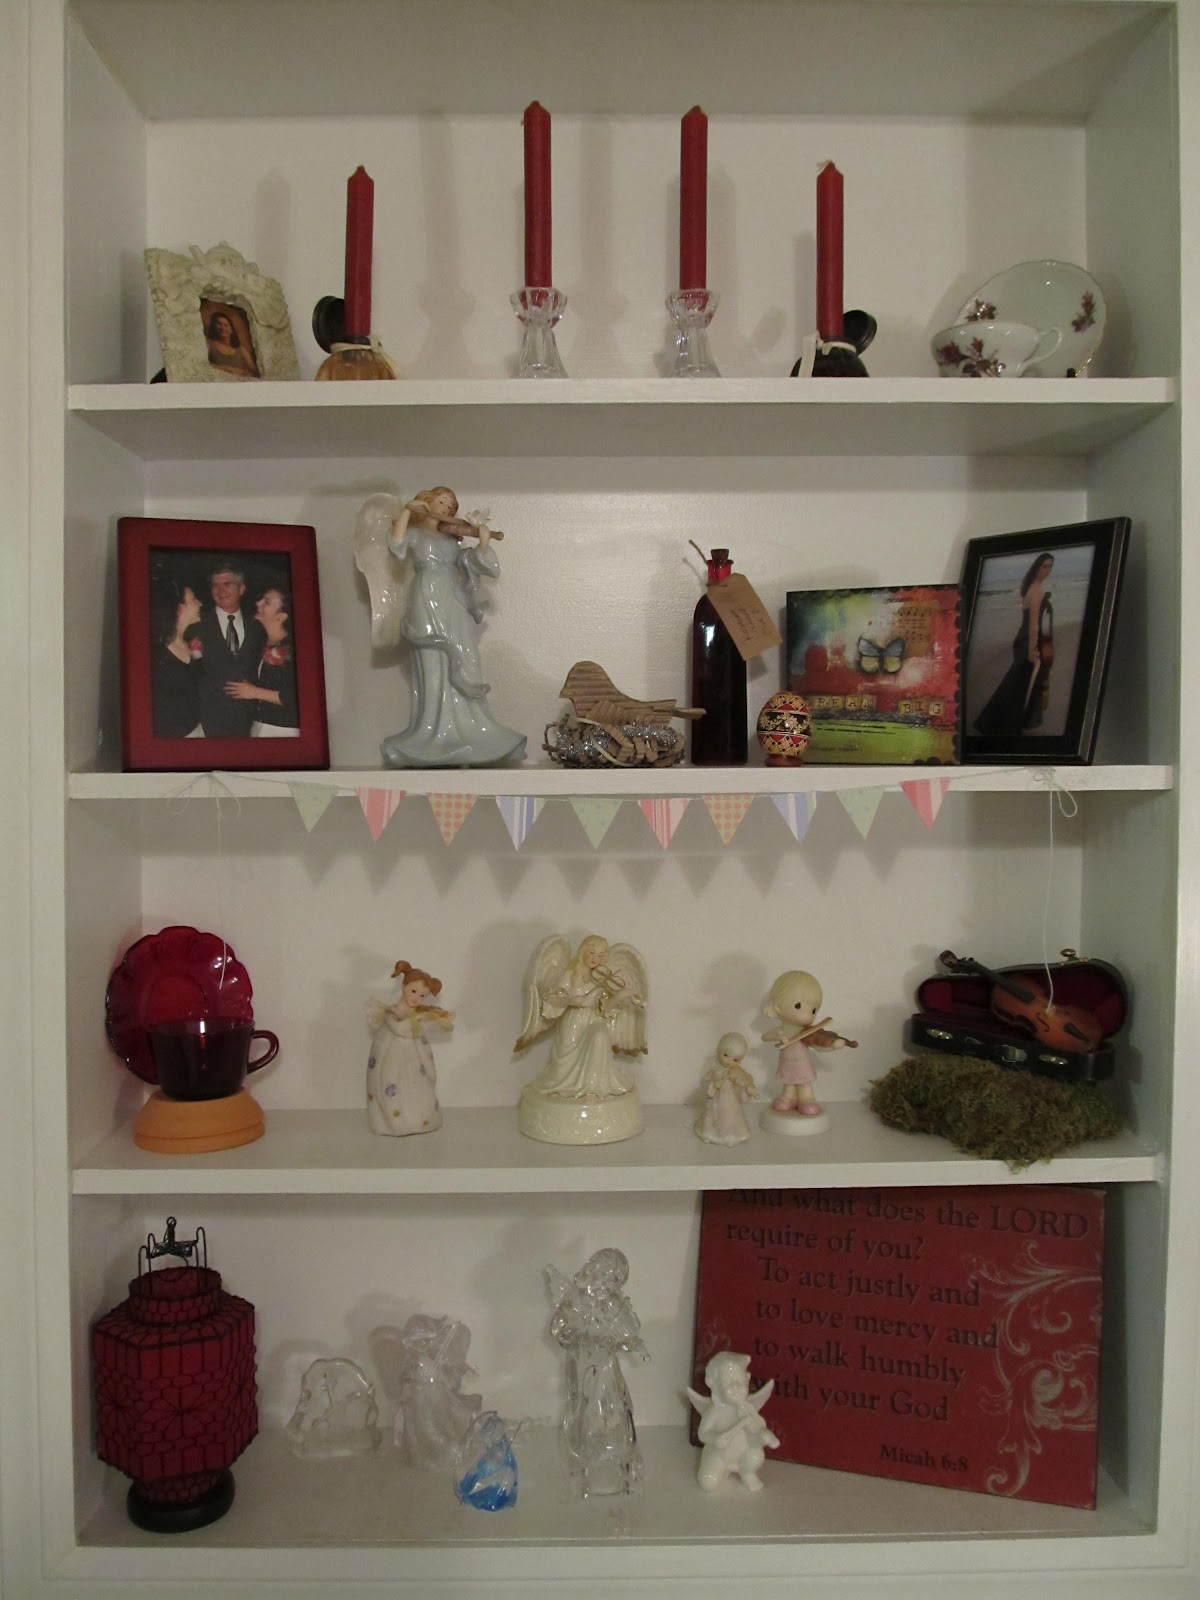
 Here's the shelves in the living room. They've gone through about six different incarnations, but I think this is how they'll stay, at least for a few weeks! The top and bottom shelves are just like they were. The next-to-bottom shelf has my violin angels that used to be in the phone nook, and the next-to-top shelf was the one that drove me nuts. I put one of the violin angels there, as well as a picture some students had given me (it's kind of hot pink and lime green), a red bottle, and a little bird on a nest I made on the spur of the moment.
 The last shelf I'm showing you is the corner shelf in the living room. It's another one that drove me batty for a few weeks! I've left the bottom three shelves the way they were, added some ceramic birds to the next to top shelf, and finally figured out what to do with the top. I created some little cherry blossom branches!
Next time, I'll share how I made the bird and the flowers. They were originally going to be in this post, but it was getting pretty long already!
 First, I put the three mercury glass candlesticks I got on after-Christmas clearance into the phone nook. There was only room for a candle on the shortest one, so I had to figure out something else for the others. The tall pillar candle got the paper ball, I used some of the paper scraps from the bunting to make little flags (sewed them onto toothpicks), and I made a couple more paper balls after I found the glue stick.
The candle I wanted to use (an LED candle with a timer, so it turns on and off at the same time every evening) was too dark to go with this arrangement, so I tied a large-ish scrap of paper around it. It doesn't quite meet in the back, but you can't see, so no one can tell!

 The last shelf I'm showing you is the corner shelf in the living room. It's another one that drove me batty for a few weeks! I've left the bottom three shelves the way they were, added some ceramic birds to the next to top shelf, and finally figured out what to do with the top. I created some little cherry blossom branches!
Next time, I'll share how I made the bird and the flowers. They were originally going to be in this post, but it was getting pretty long already!
Wednesday, March 21, 2012
Spring Decorating
It's somewhat late, and I'm still in the throes of my annual Spring Break Cold (I must put it on my list to defeat that for next year), so I haven't gotten to do nearly as much stuff around the house as I'd wanted to, but I want to give you a quick peek at some of what I have actually gotten done. Remember that I'd wanted to use up some of my stocks of paper and beads? Well, done and done! (Or, started and started.)
I used some pastel papers to make miniature bunting for two shelves in my house, and then made paper balls from circles of the same paper. A bit of mint green crochet thread I've had for years was the string for the bunting, and, since I couldn't find my glue stick in the first two minutes of looking, I just sewed it all together on my sewing machine.


I set the stitch as wide as it would go, but not very long, so it would go across the string on each stitch. For the bunting, I just kept sewing until I reached the end.
The balls were a bit more difficult. I know there's a mathematical way to divide circles into equilateral triangles, but I couldn't remember it off the top of my head, so I just eyeballed the first one, then used it as a pattern to fold the other circles. Once I had all eight circles folded, I zig-zagged them together. Pretty simple, until I got to the last two seams. Those two had to be sewn a little further away from the fold line than I'd done the rest, but I figured that they could be the bottom of the sphere. After all, it has to rest somewhere, doesn't it?
I'll show you all how I used all these paper pretties later on. Happy spring!
Friday, March 16, 2012
Hear Ye, Hear Ye!
Okay, people; hie thee over to Living With Lindsay and take a look at her latest post. She's doing a giveaway of pillow covers from Modest Pillows. (Well, a store credit giveaway, but it works out to the same thing.) I don't normally wax eloquent about pillows, but these are good stuff. I wish more of the prints came in red, but that's my only criticism.
 My living room was largely furnished by friends and family. The sofa, armchair, and coffee table are from a friend's mom who was moving to another state. The corner shelf was made by my great-grandfather. I did purchase the lamps (garage sale), the little cabinet (thrown in free when I bought a chest of drawers off Craigslist), and the console table/lamps (Black Friday sale at Home Depot, of all places). You can see the sofa, coffee table, and one of the lamps (aren't they cool?) in this photo, which was taken about a year ago, right after my birthday, which is the reason for all the cards on the shelf.
I love my living room, and the furniture is all very sturdy, very attractive, and in good shape. That said, however, the sofa and armchair are not really "my style" when it comes to decorating. I like somewhat delicate, reasonably ornate, and curvy or flowing shapes, and most of my rooms are decorated in red and black, with some metallic silver and gold thrown in to soften things up a bit. No orange anywhere, which is my least favorite color. The sofa and armchair are big, square, and brown (orange's close cousin). Pillows and blankets help a lot to unify things and make you not notice the brown so much!
 Right now I'm looking at these covers, which would be amazing either in the living room or in the den. These other ones would be awesome in the den, to cover up the red-and-funny-green striped pillows that came with the red loveseat. Love the loveseat, but seriously think the pillows need to be another color!
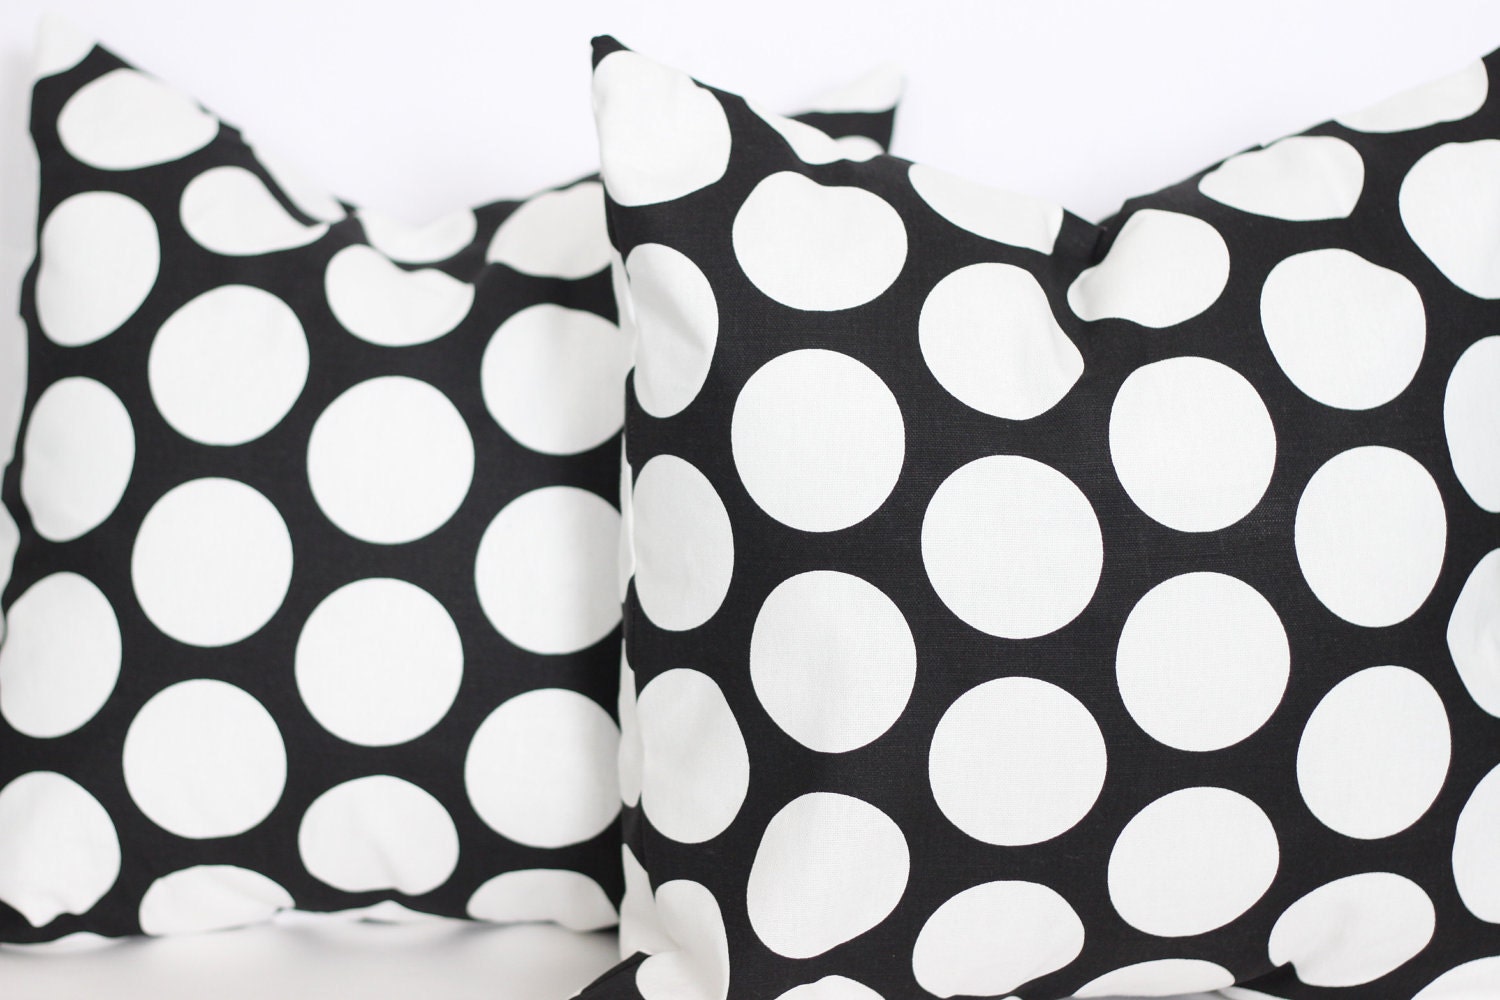
One reason I'm so stoked about this Etsy store is because they don't sell pillows, they sell pillow covers. That means I don't have to find space in my little closets to store big fluffy pillows. If I wanted to trade out covers seasonally, they would probably fit even into my miniscule linen closet!
Well, I just got off on Spring Break (I love working in academia), so I will hopefully be able to post some pictures soon of the projects I've been working on. Some I'm really excited about! Others aren't working out as well as I'd hoped. Ah, well, life is a learning process!
By the way, don't forget about the bracelet giveaway over at The Next Obsession!
 My living room was largely furnished by friends and family. The sofa, armchair, and coffee table are from a friend's mom who was moving to another state. The corner shelf was made by my great-grandfather. I did purchase the lamps (garage sale), the little cabinet (thrown in free when I bought a chest of drawers off Craigslist), and the console table/lamps (Black Friday sale at Home Depot, of all places). You can see the sofa, coffee table, and one of the lamps (aren't they cool?) in this photo, which was taken about a year ago, right after my birthday, which is the reason for all the cards on the shelf.
I love my living room, and the furniture is all very sturdy, very attractive, and in good shape. That said, however, the sofa and armchair are not really "my style" when it comes to decorating. I like somewhat delicate, reasonably ornate, and curvy or flowing shapes, and most of my rooms are decorated in red and black, with some metallic silver and gold thrown in to soften things up a bit. No orange anywhere, which is my least favorite color. The sofa and armchair are big, square, and brown (orange's close cousin). Pillows and blankets help a lot to unify things and make you not notice the brown so much!
One reason I'm so stoked about this Etsy store is because they don't sell pillows, they sell pillow covers. That means I don't have to find space in my little closets to store big fluffy pillows. If I wanted to trade out covers seasonally, they would probably fit even into my miniscule linen closet!
Well, I just got off on Spring Break (I love working in academia), so I will hopefully be able to post some pictures soon of the projects I've been working on. Some I'm really excited about! Others aren't working out as well as I'd hoped. Ah, well, life is a learning process!
By the way, don't forget about the bracelet giveaway over at The Next Obsession!
Sunday, March 11, 2012
Obsessive Giveaway
Yuni Kelley over at The Next Obsession is hosting a giveaway on her blog. The prize is a chunky gold chain bracelet from her Etsy shop, as well as a glittery pink nail polish. I like the ease of the way she has the entries set up! At any rate, I thought I'd share the giveaway with you here, even though I'd really like to win it myself. Good luck!
Saturday, March 10, 2012
New Look(s)
 I don't really like the brown-and-beige look of this blog; I had just selected that as the least offensive choice among the basic templates available on Blogger. However, I'm going to be trying out some different looks over the next few weeks. So if you come here and things look strange, don't just assume you've gotten a weird link. It's still me! That said, my tastes tend to be for rather...strong...looks. I'll try to keep the background from giving anyone headaches or any such thing, but please let me know if the current look is distracting, or headache-inducing, or just plain strange. Thank you!
Journey Update
I've made two necklaces this week, so I have progressed a little on the "Reduce Bead Stash" goal. Unfortunately, I've been too busy with work and social obligations to actually take photos of the necklaces. Hopefully that will happen soon. I have another busy week coming up at work, but the week after that is spring break! I'm hoping to use that time to get my house and yard ready for spring. I would really like to invite my great-aunt (an amazing crafter and decorator) over sometime in the next few weeks to show her my house and my lace pillow (the pillow on which I make bobbin lace, not a pillow made from lace). Now that I've talked about all this on the blog for God and everybody to see, I have to do it, right?
Wednesday, March 7, 2012
Journey of a Thousand Steps
I know, I know, I'm a couple of months late for making a "goals" post. But I've been thinking about goals a lot over the past couple months. So here are some of my "Domestic Adventure" goals
1. Reduce my paper stash. I have quite a lot of papers, mostly bought for scrapbooking, but I haven't done any physical scrapbooking for the past couple years, and I doubt I'm likely to do much in the near future. I want to make cards, gifts, and whatever else I can to reduce the amount of paper I have and open that space up for other storage (or just neater storage of the things I already have).
2. Reduce my bead stash. I have several baggies made up with all the supplies I need to make specific projects. Some will take under an hour, while some will probably take me a few weeks. Right now, my bead storage boxes are full to bursting, so I need to finish the projects I've already separated out, and find things to do with some of the other beads I have. I may have to purchase some additional beads in order to do that, but I need to be sure that each project I do uses at least some beads from my stash.
3. Reduce my fabric stash. Again, just like with my beads, I have fabrics and patterns set aside for projects, and I need to finish them. I also need to find uses for other pieces of fabric I have, and perhaps even just get rid of some. I used to try to make quilts, so I would save even rather small bits of fabric, but I have come to accept the fact that I am not a quilter, and many of those little bits of fabric will never get used.
4. Begin packing healthy lunches. My diet definitely has been lacking in the fruits-and-veggies end of things, so I need to begin packing some lunches that involve those two food groups.
5. Stock the freezer over the summer. Again, if I have healthy things to grab from the freezer on no-time-to-cook days, I'm less likely to go the pita-and-hummus or peanut-butter-on-a-tortilla route for supper.
6. Put some bushes and perennials into my landscape. I have planted things over the last few years, but many of them have died due to lack of water during our hot Florida summers. Last summer I finally had a well dug and an irrigation system put in, so I don't have to pay through the nose to have green grass. Now that I can actually keep plants alive over the summer, I'd like to do some actual landscaping! I have a Pinterest board that's quickly filling up with plant ideas, and firepit ideas, and ways to incorporate vegetable gardening into the general landscape. So let's do this!
Saturday, March 3, 2012
One Tiny Step in Craft Room Organization
 I have my vast collection of ribbons in some of those little clear storage drawers. Many of them are on spools, but others were bought by-the-yard or came around gifts, blankets, flowers, or chocolate boxes. I try to keep them sorted by color in little baggies, but they don't always fit...or stay inside the baggies. When I pull the drawer out, this is what I get. And if I want to get a ribbon out of the bag, all the ribbons must come out.
Recently, I've seen ideas for wrapping ribbons around either small pieces of cardboard or clothespins. I don't have any cardboard to turn into ribbon holders at the moment, but the clothespins seemed like a pretty good idea.

There are lots of pictures of this idea all over the internet, so I'm not exactly going to do a tutorial. I will, however, tell you a few things that worked for me. If a ribbon had an angled end, I clipped the tip of the angle into the clothespin. If not, and the full width of the ribbon wouldn't fit within the clothespin's jaws, I folded an angle into the end of the ribbon (or blanket binding, in this case.)
If the ribbon was wider than about a half inch, I tried to wind it in straight, smooth rounds on top of itself. That worked better with some ribbons than with others. There were a few velvet ribbons I had almost a yard of, and they didn't want to stay straight at all! By the way, this works best with about a yard of ribbon or less. You can try it with up to two yards, if the ribbon is rather thin, but more than that and I'd definitely say to try spooling it on a piece of cardboard, because it will get rather ungainly on the clothespin. If the ribbon was narrower than a half inch, I didn't even try to keep it in straight lines, but instead wound evenly around the full length of the clothespin's jaws.

I tried a couple different ways of securing the ends of the ribbons. A straight pin seems to be what they used in a lot of the pictures I found, but I'm somewhat concerned about the pins snagging on other ribbons. I also tried threading the last few rounds of ribbon through a safety pin, sort of as a latch to loosely hang on to the end of the ribbon. I didn't have nearly enough spare safety pins, however, so I secured others with a dab of scotch tape, just like they do in some of the fabric stores. I'm thinking I don't want to leave that on too long, but it will probably be fine as a short-term solution until I find more safety pins.
 The clothespins take up a good bit more space in my drawer than the baggies did, but I'm thinking that they will be much easier to use. And if I can see the ribbons, I'm much more likely to actually use them! (This year I'd like to drastically reduce my stash of paper, ribbons, and beads.) It's not much, but it's definitely a step in the right direction!
Wednesday, February 29, 2012
The First Spring Decorations
 This is how I've had my corner shelf decorated for winter. Not great, but not horrible. My grandparents gave me the shelf when I bought my house--it was made by my great-grandfather! These photos don't actually show what a pretty color it is, but I'm not really home enough in daylight hours to take good natural-light photos. At any rate, I love the shelf, but I've never really had good luck with finding things to go on it. I like the little angel candleholder, but she's very wintery. The little lantern on the top shelf was a Target Dollar Spot find I bought just to have something to fill the spot, and have never found anything better. At one point I had my Old Country Roses cream pitcher on the next-to-top shelf, but it's now in a safer home in the china cabinet (when it's not out holding flowers). I keep looking at things that might be interesting additions to the shelf, then deciding that they're too dark to really show up in a dark wood shelf in a somewhat shadowy corner!
 Here is the start of a spring makeover for the corner shelf. I've resigned myself to not really being able to decorate for spring--my basic house colors of red and black don't really lend themselves to bits of pink, green, and lavender being thrown in! But I figure I can lighten things up a bit, and get rid of the blatantly winter bits.
I've replaced the wintery angel with some porcelain birds I got at Michael's. I really like them, but they're a bit short for the shelf. I'm thinking they either need to go on the top shelf, or I need to "floof-ify" them with some lace, flowers, grass, or something to give them some height.
The lantern has been replaced with a sheet music covered treble clef, also a Michael's find. I think it's really cool, but could also use a bit of something more. I'm thinking a base (something to give it some height, not a bass clef, haha), or maybe some flowers. Red roses would be a bit cliche, but red is my favorite color. Black would certainly match, but wouldn't exactly help with the whole "decorating for spring" idea. Hmm...ideas, anyone?
I still plan on switching out the candle holder--it seems a bit silly to have a candle holder in a place where I would absolutely not light a candle. I still like the rose bouquet at the bottom, although perhaps I should pull it forward. And the amaryllis pot is perfect spring decor, since those are spring bulbs. Ooh, perhaps I could find some silk red-and-white amaryllis flowers! That would be springlike while perfectly matching my decor!
Saturday, February 25, 2012
Quick Gift
I was invited to a surprise birthday party this week! One sure way to be sure no one ruins the surprise is to wait until Wednesday to plan the surprise for Friday. I wanted to give an actual gift to this friend, not just a card, but I didn't have much time. Quick and fun solution: a Long-Day-At-Work Survival Kit made with some supplies I got while running my Friday afternoon errands!
At Michael's (craft store), I got a blue (the b-day girl's favorite color) bandanna and some blue duct tape. At Target, I got a sewing kit (in case buttons and hems don't stay where they should), safety pins (in case blouses gape or anything else doesn't stay where it should) a Tide pen (in case lunch winds up where it shouldn't), and a bag of Dove Promises chocolate (for chocolate and encouragement, which make any situation better).
I folded the bandanna into an envelope shape with the pretty side on the inside, then coated it with duct tape on the wrong side. I made sure to run a fold of duct tape along the bottom of the envelope so nothing would fall out.
I used some scraps of blue ribbon yarn added to the topmost corner of the envelope as ties. Then I turned the whole thing inside out, which put the pretty side of the bandanna on the outside and the duct tape on the inside.

I added all the treats (putting the food in a separate pocket from the Tide pen and other items).

I folded the whole thing over twice, basically rolling it up on itself, then tied it with the ribbon yarn. Finally, I wrote the birthday girl a quick note wishing her a happy birthday and explaining each item. If I'd had more time, it would have been nice to have designed a printable with a pretty picture and the explanations, but I didn't! (As it was, I was a bit late, but the hostess, knowing the lack of timeliness common among our group, invited the birthday girl a to arrive an hour later than the rest of us.
From start to finish (not including the shopping, which was mixed in with my own errands), this whole project probably took me fifteen minutes--a very doable quick gift! I'm already thinking about doing similar gifts for other people with their favorite color bandannas and duct tape, and a theme that fits the person. Maybe a new mom relaxation kit with some lotion, an electric candle (so they don't have to worry about leaving the fire unattended when they fall asleep or go to check on the baby), an easy-to-read paperback, and some tea; a movie night kit with a DVD, candy, and popcorn; a travel kit with a travel toothbrush, small toiletries or toiletry bottles, earplugs, socks, and sleep mask...or just about anything! I think interesting presentation can help even a simple gift communicate loving thoughtfulness.
At Michael's (craft store), I got a blue (the b-day girl's favorite color) bandanna and some blue duct tape. At Target, I got a sewing kit (in case buttons and hems don't stay where they should), safety pins (in case blouses gape or anything else doesn't stay where it should) a Tide pen (in case lunch winds up where it shouldn't), and a bag of Dove Promises chocolate (for chocolate and encouragement, which make any situation better).
 | |
| Front |
 |
| Back |
I used some scraps of blue ribbon yarn added to the topmost corner of the envelope as ties. Then I turned the whole thing inside out, which put the pretty side of the bandanna on the outside and the duct tape on the inside.

I added all the treats (putting the food in a separate pocket from the Tide pen and other items).

I folded the whole thing over twice, basically rolling it up on itself, then tied it with the ribbon yarn. Finally, I wrote the birthday girl a quick note wishing her a happy birthday and explaining each item. If I'd had more time, it would have been nice to have designed a printable with a pretty picture and the explanations, but I didn't! (As it was, I was a bit late, but the hostess, knowing the lack of timeliness common among our group, invited the birthday girl a to arrive an hour later than the rest of us.
From start to finish (not including the shopping, which was mixed in with my own errands), this whole project probably took me fifteen minutes--a very doable quick gift! I'm already thinking about doing similar gifts for other people with their favorite color bandannas and duct tape, and a theme that fits the person. Maybe a new mom relaxation kit with some lotion, an electric candle (so they don't have to worry about leaving the fire unattended when they fall asleep or go to check on the baby), an easy-to-read paperback, and some tea; a movie night kit with a DVD, candy, and popcorn; a travel kit with a travel toothbrush, small toiletries or toiletry bottles, earplugs, socks, and sleep mask...or just about anything! I think interesting presentation can help even a simple gift communicate loving thoughtfulness.
Wednesday, February 22, 2012
Under Construction
 I'm crocheting a vintage afghan. Yes, I do believe that, even though I'm making it right now, in 2012, it counts as vintage, not retro. Why? Because these seven balls of yarn and the accompanying instruction sheet have spent the past forty years or so up in the top of a closet in my Grandmother's house. My aunt, who taught me to crochet, was the original purchaser of this kit, and she apparently got as far as winding the skeins into balls. (Why people used to do that, I'm not entirely certain. Skeins are certainly easier to keep in one place when you're working with them.) Grandmother was recently going through her closets, getting rid of stuff, and asked if either of us wanted this. My aunt doesn't crochet much any more, but I'm never one to turn down free yarn, even if it's in such terrible mid-1970s colors!
I've made some modifications to the pattern. First, it calls for a "size 5" hook. It obviously doesn't mean a 5mm hook--that worked up way too small in the gauge sample. I tried a size N hook (9mm). That was a bit too big, but I couldn't find an in-between hook when I was starting the project, so size N it is. I made up for the slightly larger gauge by eliminating one "ripple" worth of stitches from the foundation chain. I also discovered that I'm missing one ball of green yarn. I should have eight colors, but I only have seven. Hopefully the missing ball of yarn won't be enough to make the resulting afghan incredibly short--we'll see. As for colorway instructions, apparently I should start with the "dark avocado," proceed through "med. dk." and "medium avocado" to just plain avocado, then repeat with "dark gold" through to gold. No telling if I'm missing "med. dk. avocado" or "medium avocado." But I thought the stripey look of green-gold-green-gold would look nice, with the whole thing going from light to dark. Granted, that does mean I have two different golds next to each other, but I think the light and dark gold colors are different enough that the stripe effect will still work.
The yarn is rather different from anything I've ever used before. It's even thinner than the sport-weight yarn I was using a few weeks ago. It's definitely all synthetic, but it almost seems like the yarn used for needlepoint work--thin, and not very highly twisted. But it does seem stronger than needlepoint yarn, which is definitely a good thing!
I've been working on this thing for the better part of a week and have not quite finished working through all seven colors. (I have about 3/4 of the second row of my seventh color left.) I've only once tried to make a whole afghan, and I did finish that one, but it took me fifteen years! Hopefully this one will not take nearly that long. I'd really like to get it done within this year.
What do I plan to do with it once I'm finished with it? Certainly not lay it over my sofa! I suppose I might put it into my linen closet as a "blanket of last resort" for when the weather is really cold, or I might see if by some chance any of my friends actually like this color combination. (Anyone?) But I'm thinking I may just donate it. I've seen groups that collect handmade blankets, or old blankets, or any blankets at all, and give them to homeless people. While this may not be the warmest blanket ever, it will be pretty lightweight, so perhaps a homeless person might like it...maybe. We'll see. I guess the first step is to finish it!
Saturday, February 18, 2012
Clothing Swap Party
I recently had my Second Annual Clothing Swap. Food was made and eaten, closets were cleaned, clothing was swapped, and a good time was had by all! I guess I should start by explaining the concept behind the party. It started last spring when I was needing to get rid of a lot of clothes. Some was simply not quite the style anymore, and I had no qualms about sending that stuff to Goodwill, I just had to get around to it. (And you know, those round tuits are often very hard to come by.) I also had a lot of clothes that had gotten too big, but that I still really liked. Those would be harder to get rid of. I had some friends I thought might enjoy some of those items, and I felt it would be easier to let go of them if I knew they were going to a good home.
Then, while surfing the web, I found the idea of a clothing swap. Some people get really crazy about it, assigning point values to items based on how desirable they are, or declaring that you will leave the party with the same number of items as you brought, like it or not. I'm way simpler than that. I invited a bunch of girls (wide range of sizes, wide range of styles, but all within ten years of my age) to come and bring whatever clothes and accessories they didn't want taking up space in their closets any more. We'd all go through all the stuff, and whatever didn't get taken was getting loaded up in a car and going straight to Goodwill. If there were things that multiple people wanted, we'd have a little fashion show and see who it looked best on!
 As I said, this was the second year of doing it, and almost all of last year's attendees came, along with some new ones. (One girl even brought her mom!) I put a few boxes on the coffee table to contain some of the smaller items, such as purses, scarfs, belts, and jewelry. Shoes went underneath the table. (We had a separate area in the foyer for people to leave their own purses and shoes!) Two different girls had hanging racks, which they brought, which made a good place for dresses and skirts. The skirts that didn't fit on the racks were just draped over a chair, and we sorted through everything, making stacks of shirts, tank tops, pants, and shorts. After we all sorted our stuff out (and got a preliminary glance at everyone else's goodies), we moved on to the food!
 The night before, I had set up the table, so it took less than a half hour of prep that morning to get everything on the table. I put all the serving dishes where they would wind up. (Extra points to anyone who recognizes my candle vignette that was on the coffee table last month. I just moved it to the dining room table so we'd have space on the coffee table, but I wouldn't have to take the time to put all those candles away.) The cracker boxes are sitting next to the plate that will hold the crackers, and the hummus bowl that will fill that empty space is filled and waiting in the fridge. All my refrigerated items are gathered together on the same shelf, my nonrefrigerated items and the tools I'll need to prep the food are together on the counter, and the glasses are all set up on a large tray. (I have discovered that if my glasses and drink pitchers are on a tray, I wind up with a lot fewer damp spots and tea stains on the tablecloth.)
 The morning of the swap, I pulled the hummus out of the fridge, put my sliced pita and ciabatta on the tiered server, poured dipping oil in the individual bowls, slathered some jalapeno jelly on some brie cheese, wrapped it in phyllo, and popped it in the oven to warm, and made some little caprese bites I found on the ever-useful Pinterest. My sis-roomie helped with pouring the dipping oil and piling the breads on the serving dish, but even had I been working alone, the prep would have taken under an hour, and everyone loved the food. (At the far end of the table are some drinks, crackers, and dip that some of the attendees brought.)

By the way, the pictures of caprese bites I found on Pinterest were really fancy looking, but I just used chunks of Roma tomatoes, torn sections of basil leaves, and fresh mozzerella "pearls" (fancy way of saying pre-made chunks), and mine were just as pretty in the serving dish as those fancy ones!
After we had some food, we moved on to trying on all sorts of different items of clothing. The great thing about a party like this is that you can try out something that may be a step outside of your usual style without worrying about wasting money! I saw a couple items from last year's swap reappear this year, and no one got any hurt feelings. We all just were thrilled about our newly cleaned closets and our fun few finds!
Then, while surfing the web, I found the idea of a clothing swap. Some people get really crazy about it, assigning point values to items based on how desirable they are, or declaring that you will leave the party with the same number of items as you brought, like it or not. I'm way simpler than that. I invited a bunch of girls (wide range of sizes, wide range of styles, but all within ten years of my age) to come and bring whatever clothes and accessories they didn't want taking up space in their closets any more. We'd all go through all the stuff, and whatever didn't get taken was getting loaded up in a car and going straight to Goodwill. If there were things that multiple people wanted, we'd have a little fashion show and see who it looked best on!
 As I said, this was the second year of doing it, and almost all of last year's attendees came, along with some new ones. (One girl even brought her mom!) I put a few boxes on the coffee table to contain some of the smaller items, such as purses, scarfs, belts, and jewelry. Shoes went underneath the table. (We had a separate area in the foyer for people to leave their own purses and shoes!) Two different girls had hanging racks, which they brought, which made a good place for dresses and skirts. The skirts that didn't fit on the racks were just draped over a chair, and we sorted through everything, making stacks of shirts, tank tops, pants, and shorts. After we all sorted our stuff out (and got a preliminary glance at everyone else's goodies), we moved on to the food!
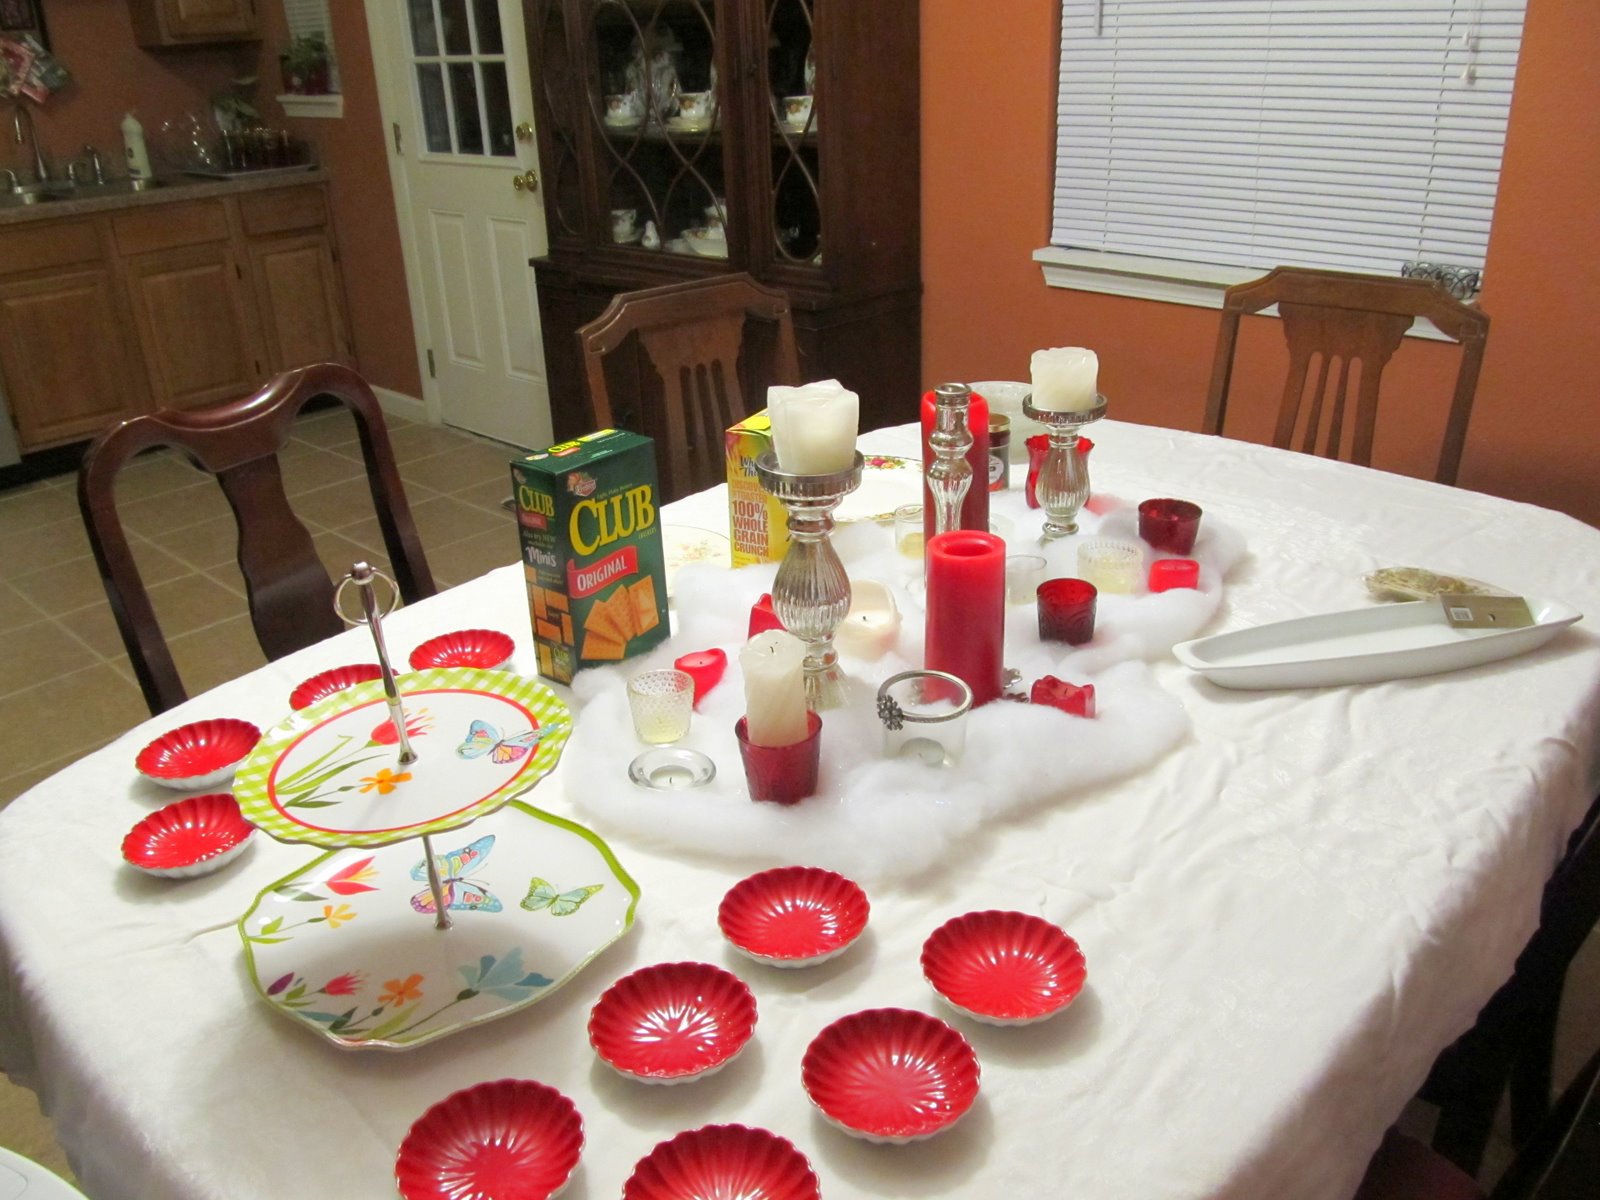


By the way, the pictures of caprese bites I found on Pinterest were really fancy looking, but I just used chunks of Roma tomatoes, torn sections of basil leaves, and fresh mozzerella "pearls" (fancy way of saying pre-made chunks), and mine were just as pretty in the serving dish as those fancy ones!
After we had some food, we moved on to trying on all sorts of different items of clothing. The great thing about a party like this is that you can try out something that may be a step outside of your usual style without worrying about wasting money! I saw a couple items from last year's swap reappear this year, and no one got any hurt feelings. We all just were thrilled about our newly cleaned closets and our fun few finds!
Subscribe to:
Posts (Atom)